What Actually Counts as “Bombing the Airfield”
In Sim Battles, an airfield is not a single hitbox but a cluster of separate modules. Destroying or heavily damaging enough of these modules is what “kills” the airfield and starts to seriously hurt the enemy team.
Key airfield modules:
- Runway and touchdown area
Bombing the beginning and end of the runway makes takeoffs and landings harder and contributes a lot to the overall “airfield HP” being reduced. - Repair / refuel zones, hangars, workshops
These buildings represent maintenance and logistics. If you damage or destroy enough of them, the airfield becomes much less effective as a spawn and repair point. - Aircraft parking and vehicle ramps
Parking zones, parked planes and ground vehicles around the airfield are all valid bombing targets. Destroying them gives tickets and helps push the airfield toward a disabled state.
You don’t have to wipe every single object; your goal is to dump enough tonnage into the important sectors (runway, service areas, parking) so the game considers the airfield “crippled.”
How Much Bomb Load You Need
Numbers vary by BR, map and patch, but there are some practical rules of thumb:
- Roughly 1–2 tons of TNT equivalent (about 2,000-4,000 lb of bombs) dropped accurately on a key section (runway start, dense hangar block, tight parking area) is usually enough to heavily damage that module.
- Fully disabling a WW2‑era airfield often takes several tons total, spread across multiple sectors, especially if you’re relying only on unguided bombs.
- At high tiers, a single 2,000-lb guided or precision bomb dropped correctly on the right cluster can cripple a critical module on its own, especially if you combine that with previous damage from rockets or napalm.
The more concentrated the targets and the better your aim, the less total bomb load you need.
Choosing the Right Aircraft and Loadout
Heavy bombers
Best for methodical, high‑altitude airfield strikes:
- Carry multiple large bombs (1,000-2,000 lb / 500-1,000 kg) plus some smaller ones.
- Plan to cover several airfield sectors in one or two passes: runway, hangars, parking.
- Climb high, approach from a flank and rely on bomb sight accuracy rather than low‑level dives.
Strike fighters and attackers
More flexible and often deadlier on modern BRs:
- Carry a mix of rockets, napalm/HE bombs, or guided bombs.
- Use rockets and napalm to shred parking zones, fuel and maintenance blocks in wide swaths.
- Use guided bombs or CCRP drops to delete individual high‑value modules (runway segment, main hangar cluster) from safe altitude.
Choose loadouts that let you:
- dedicate some ordnance to AA defenses,
- keep enough heavy bombs or napalm to hit the runway and service zones afterward.
Approach Route and Altitude
High‑altitude, safe approach
Best for heavy bombers and guided bomb platforms:
- Climb to 6–8 km in props or 8-10+ km in jets, away from the main front.
- Only turn toward the enemy airfield once you’re high and reasonably safe from most fighters.
- At 15–20 km distance, stabilize speed and heading, prepare your bomb sight or CCRP mode, and line up a straight, steady run across your chosen sector.
After release:
- Enter a shallow dive to gain speed and get off the airfield’s AA envelope as quickly as possible.
- Don’t linger over the target; drop, then immediately turn away.
Medium / low‑altitude strike
Better for fast attackers and rocket spam:
- Use terrain and low altitude (tens to a few hundred meters) to stay off radar and minimize exposure to AA.
- Pop up briefly to 300-800 m near the airfield, unleash rockets/bombs in one or two quick passes, then dive away back to low level.
- This style is riskier but excellent for wiping parking areas and exposed buildings.
Where to Drop Your Bombs
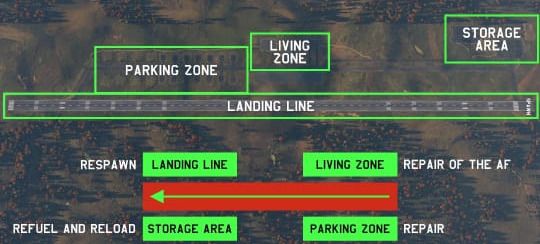
To actually cripple the enemy airfield, focus your bomb load on these modules:
- Landing Line
Drop heavy bombs along the Landing Line (runway strip) to disrupt takeoffs and landings and heavily damage the airfield’s core hitbox. Hitting the touchdown area and the central part of the strip gives the best effect. - Parking Zone
Aim bomb runs or rocket passes across the Parking Zone where aircraft are parked. This both racks up individual target kills and adds a lot of damage to the airfield’s overall health. - Storage Area
Hit the Storage Area with large bombs or clustered rockets. This represents fuel/munitions storage; destroying it greatly weakens the airfield’s ability to function as a refuel and reload point. - Living Zone
Use remaining ordnance on the Living Zone (barracks / support buildings). Damaging this sector contributes to shutting down repair and general “Repair of the AF” capability.
In practice, you want to sweep multiple sectors in one or two passes: for example, one heavy drop centered on the Landing Line and Storage Area, then a follow‑up run that rakes the Parking Zone and, if you still have bombs, the Living Zone.
Dealing with AA and Interceptors
You rarely get a free run at an enemy airfield, especially in Sim.
To survive to bomb release:
- Neutralize airfield AA first if you can.
- Use a portion of your guided bombs/rockets to kill visible radar/AA installations around the airfield perimeter.
- Once those are gone, later passes become dramatically safer.
- Maintain high speed and altitude.
- In jets, drop from high Mach and high altitude so AA has very limited time to track you.
- In props, stay at 6–7 km and minimize your time directly over the airfield.
- Watch the sky, not just the ground.
- Constantly scan for interceptors climbing up to you; if one is clearly coming, it’s often smarter to drop on a secondary target and disengage than to die with bombs still on board.
- Use your defensive gunners and situational awareness tools to avoid being surprised from below or behind.
Signs You’ve Successfully Crippled the Airfield
You’ll know your strike worked when:
- The enemy team’s tickets begin to drop noticeably faster than before.
- Fewer enemy players are spawning from that airfield, and those who do often struggle to take off, land or repair.
- The airfield becomes a much less attractive destination, forcing enemy pilots to spawn or operate from other, less convenient locations.